Fruits are Budding!

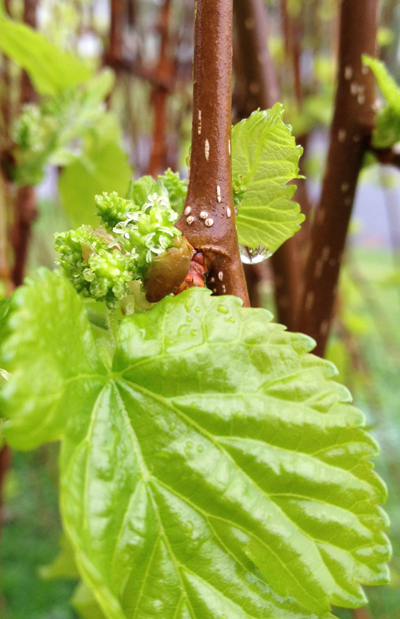
Hardy Chicago Fig beginning to fruit in late March near Washington D.C.

Hopefully our baby figs will survive tonight's frost! March 26th, 2012.

A mild Winter and early Spring for the Mid-Atlantic region has had an excellent effect on the flora.  Our March temperatures have been in the high 60’s and 70’s, even up into the 80’s.  Overnight frosts have thankfully stayed away thus far.  The Cherry Blossoms in Washington D.C. bloomed two weeks earlier than usual, the grass is already waiting for the second mow of the season and our fruit trees (as you can see in the Hardy Chicago fig on the left) have not only broken dormancy, but are growing fruit!

Update: Tonight the temperatures are forecast to drop into the high 20’s!  Darn the late March freeze!  It will be windy, too.  This type of advection frost resists most known and applicable frost prevention techniques.  Temperatures dropping below 29˚F can damage budding and flowering plants.  At only 27˚F you begin to see 90% kill rates.  We’ll just have to cross our fingers and hope that our fig location is good and our other fruit trees are resilient!

What’s Budding Early?

An early Spring is a brilliant time to be working the soil full of compost, manure and peat, developing the light, crumbly loam that our vegetables love so much.  The ground is soft with rain and full of earthworms, making new plantings an easy endeavor.  Tomato, pepper and luffa seedlings are outside in the perfectly overcast and drizzly days getting used to the climate and hardening off.  By the looks of the current weather pattern, those seedlings will go in the ground in a week, making this the earliest planting season in the Suburban Hayseed’s experience!

Mild winters and an early spring can be a blessing and a challenge.  If you have planned well and prepared early, you can take advantage of the weather and get a several week jump on summer.  Your plants will have developed a strong and deep root system by the time they get baked in the dog days.  Your Early Girl tomatoes might share their fruit a month before you usually get it.  And my favorite, your fruiting trees, bushes and vines will have you making pies that much faster!  That is, provided the late frost doesn’t sneak in and wreak your work!

Two days ahead of our potential frost I tried out the macro ability of my iPhone to take some pictures of the state of plants in the Washington D.C. metro area.  Here’s to hoping all of this beauty survives to flourish!


Bleeding Hearts are in gorgeous bloom!

Bleeding Hearts are only about a foot tall so far and are blooming bountifully.


Apple Blossoms ready to bloom on March 25th, 2012.

The apple blossoms thankfully have not yet opened.


Weeping Mulberry with berries already forming on March 25th, 2012

Berries are already forming on this Weeping Mulberry

Oh, hoary frost of late onset, please stay away.  Let the night be cool, not frozen. May the buds of this year’s plenty stay snug by the warmth of the day.

~The Suburban Hayseed

What to do with Clay Soil

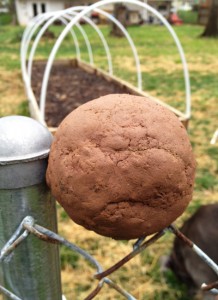
If you can make a ball out of your soil that stays, you've got Clay Soil!

A clay baseball made from the soil in our yard. This ball actually stayed together well enough to throw it and have the dog fetch it and bring it back with only teeth marks to show for the adventure!

Have you ever wondered if the soil in you area has a lot of clay?  I have read online about several tests you can perform to figure out what is in your soil.  Though I have tried them (my favorite involves a mason jar and a scoop of soil), I have settled on the simplest of all: moisten some of your soil well, or just wait until a day after it rains.  Dig up a scoop and try to make a ball out of it.  If you can make yours look like the one in the picture on the left, congratulations – you have some serious clay content in your soil!

So, you have clay soil.  What now?  Some of the problems with high clay content are that it is so dense and heavy that water, plant roots and even your shovel have a hard time getting through it.  Once water has managed to permeate the clay, it takes a long time to seep away.  As a result, plants grown in clay tend to suffer from drowning, suffocating and rot more often than in loamy soils.

There are some benefits to clay soils, though.  The nutrient levels in clay are quite high.  Depending on where you live and what kind of clay you have, you will find that the PH of the soil is naturally beneficial a certain segment of plants.  Here in the Washington D.C. region, our red clay is particularly acidic which is nice for plants such as hydrangea and blueberries.  That said, you will need to improve the drainage and friability of you clay.

Ways to Improve You Clay Soil:

  • Add Compost:  If you practice composting, this is an excellent addition to the soil.  Compost ‘lighten’ the clay, improving the drainage quality and availability organic matter and air for your plants.  I have found that all of the compost I could possibly produce would not be enough to help all of the soil we garden.  I have found a good source of vegetable compost (versus compost derived from sewage) and buy it by the cubic yard, which is a small pickup truck full.  It costs about $30 per yard at Virginia Ground Covers.  We have had good results in about a half and half mixture of compost to clay along with the other additions yet to be mentioned.
  • Add Peat Moss: Peat Moss improves both the clay’s water retention and drainage qualities as well as further ‘lightening’ the soil so that plant roots can successfully penetrate the soil in search of nutrients.  I mix in two 3-cubic-foot bales of peat into each cubic yard of compost in amending our clay.  Peat is running about $10 per bale at Home Improvement stores.
  • Add Coarse Builder’s Sand:  Coarse sand will further improve the drainage of clay soils.  We have only added sand to our blackberry and raspberry patches, finding that the volume of peat and compost is enough to work well in our other gardens.  Coarse builder’s sand is readily available and inexpensive at your local Home Improvement store. 
  • Add Gypsum:  Gypsum is sold by many different brand names for the purpose of ‘breaking’ your hardened clay soils, creating an environment more suitable for roots to grow and spread.  The results of adding gypsum are due to a chemical reaction with the clay and are temporary.  We have found it useful to add gypsum to new garden beds when we fist mix in our other amendments.  The ‘breaking’ effects help to crumble the clay into smaller bits and integrate more thoroughly.
  • Adjust your PH:  You will need to test your soil in order to adjust your PH properly.  I recommend having your local Extension Office complete the test versus buying a test kit at the store.  The Extension Office performs a much more controlled test and achieves very accurate results.  You will also need to know what types of plants you will be growing in order to adjust your PH to the correct level.  I grew up cleaning out the fireplace ashes and tossing them around the Lilac bushes to ‘sweeten’ the soil, as my father calls it.

With the need for so many additions to our soil, we build raised beds for our gardening.  With some guides to gardening, it is suggested that in raising the beds you might as well simply fill them with good garden soil and leave the existing clay alone.  I am very careful to turn up the clay and mix it in to the amendments.  Why?  My wife asked me the same thing.  There are several reasons:

Our native clay have mineral resources and nutrients that I would otherwise have to add, creating more effort and expenditure.  Clay itself is has excellent water retention properties which are a welcome addition to any garden, in moderation.  Working the amendments into the clay results in raised beds that are cultivated 6 to 8 inches below ground level, so our 12 inch tall raised beds are actually 18 to 20 inches deep in terms of perfect plant growing soil.  Lastly, our clay represents here.  Were I to grow my vegetables in the same purchased soil mixture as someone a thousand miles away, I might as well have grown them anywhere.  I am attached to tasting a sense of Terroir in our food.  There is more to Local Food than where it is produced.  A producer of hydroponic lettuces just down the street is definitely local in that the produce has not been trucked a thousand miles (which I am thankful for), yet that same lettuce has no sense of place in the respect that it could have been grow anywhere.  I’ll still buy the locally produced hydroponic lettuce over the heads grown half way around the world, and I’ll feel good about it!  And I will still expend the extra effort required to churn our clay up into the compost of our raised beds.

Please share your adventures in working with clay soil.  We’ve all taken different approaches and have differing results in trying to grow a successful garden in the hard-packed clay.  Feel free to ask for some help, too!  I’m sure that if I cannot help, there are many readers who have struggled with similar issues and would love to help.

Cheers!

~The Suburban Hayseed.


Sprouting Seeds!

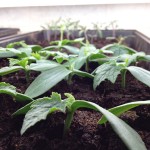
Healthy Luffa and cheery tomato sprouts in an economical speed sprouting shelf.Sprouting seeds indoors at home is both interesting and economical.  Our family has found it fascinating to prepare the soil blocks, organize the seeds, water them daily and watch them emerge and develop into the plants that will be our garden. Thanks to my lovely and thrifty wife, the BonBonEater, our entire seed spending this year totaled $6.74 including shipping.  Check out her blog soon for how she accomplished this feat!  Now that’s a serious savings compared to the $2.47 we would have paid at a local nursery for each tomato seedling!

In addition to the savings on the seeds, sprouting seeds indoors allows you to get a jump on the growing season, thereby giving your plants the head start to develop a strong and thriving energy factory with which to produce a bumper crop of fruit$ and vegetable$.  With a bit of prior planning, you can have healthier seedlings to plant than you could buy.  An added bonus is that you will know exactly how they were grown – organic or otherwise.

Indoor seed sprouting can be as simple or complicated as you wish.  I am going to share how we do it, which is more involved than sticking seeds in a pot in the window, but less complicated than a full-blown nursery setup.

The following is a list of the key components we use in sprouting seeds.

I am including ‘why’ we use each, and approximately how much they cost as well as their expected lifespan so that you will be able to calculate the per-year cost and make the decision to invest or not.

Soil Blocker:

The BonBonEater really had to convince me to try this contraption out.  I was satisfied using compressed peat pellets which are inexpensive and easy.  She pointed out that we have to buy the pellets every year, and in spite of their claim that the netting around the pellet biodegrades, we dug them up every spring as we turned the soil.  The Soil Blocker  uses wet seed starting mix and creates freestanding ‘blocks’ of soil in which to place your seeds.  Some advantages are that you can use your own formulation of seed starting mix, choose your own trays on which to sprout your seeds, and the soil blocks provide the correct environment to ‘air-prune’ the seedling’s roots.  Apparently the soil blocks nearly eliminate transplant shock as well.  A 2-inch soil blocker like we use costs around $30 and will last a lifetime. Excellent instructional videos and soil blockers for sale can be found at PottingBlocks.com.

Seedling Heat Mat:

Seedling heating mats are a real bonus for sprouting seeds indoors.  They gently warm the soil in your seed trays 10 to 20 degrees above the ambient temperature in the room.  In the event that you are going to use and unheated portion of your home for your seed sprouting such as a garage or utility room like we do, the warming mats are a must in order to get a good jump on the season.  It is darn cold outside in February, so getting the best germination and growth out of our seeds requires a mat.  They only draw a few watts of power, so seedling heating mats add nearly nothing to your overhead except for the price of the original purchase.  You can find seedling heating mats at many local home improvement stores and nurseries as well as online.  They cost between $15 and $30 depending on their size and where you buy them.  FarmFeliz.com has an amazing array of heating mats and germination kits at very reasonable prices.  They carry a cool windowsill heat mat that would be perfect for you if you keep your house cool in the winter and want to give a boost to your seed sprouts!

Lights:

Once your seedling have developed their first set of real leaves (not the first two little round ones that emerge) they will need a good, strong source of light to begin their photosynthesizing life.  A sunny windowsill will be a good start, but the short days and week winter sun will need some help in order to provide your seedlings with enough energy to grow dense and stocky like you want.  There are many types of lights on the market for such purposes, but we chose to go a very economical yet effective route: florescent lights.  I bought 4 foot shop light fixtures at Lowes for $13 each.  Our 4 foot by 2 foot shelf dedicated to sprouting seeds is completely covered by 3 of the fixtures.  Bulbs cost about $5 for a set of 2.  I bought some warm (3500k) and some cool (6500K) bulbs and put one of each type in the fixtures, which hold 2 bulbs each.  This gives your plants a good, balanced diet of light and saves a lot of money versus buying the ‘grow light’ designated bulbs. Total cost for our lighting was $54.  The bulbs will need to be replaced every 2 to 3 years for $15, and the fixtures should last many more than that.

A Timer:

Every lighting set-up for sprouting seeds needs to have a timer.  You can spend oodles of money on timers if you would like.  Fortunately, florescent shop lights have only 2 pronged plugs and use relatively little energy.  This allows us to use a $4 timer purchased at Ikea.  It’s mechanism is simple and mechanical which makes it inexpensive, reliable and easy to use.

Is Sprouting Seeds Cost Effective?

Seeds, lights, heating mats, timers, soil blocker – these all require an investment in time and money.  Is it really worth it when compared to buying seedlings at your local nursery? The answer depends on how many plants you want to grow.  If you only need 2 tomato plants, you will find this investment to be steep when compared to bought seedlings. If you need 300 tomato plants, you will need additional equipment.  I will share what our seed sprouting setup will accommodate.  You can do your own math from there.

the number$ for our family this year.

  • Seed Sprouting Setup Cost: All equipment and soil required to create and maintain a 2 foot by 4 foot seed sprouting shelf on which we sprouted 96 seeds: $145. We only need 45 of the seedling ourselves, so we will have plenty to give away.  For the additional cost of another seedling heat mat, a bit more soil and a tray ($20), and by tightening up the spacing of the soil blocks, we could sprout as many as 160 seeds!
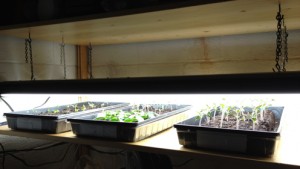
    Photo of our Seed Sprouting Shelf.

    Our $145 Seed Sprouting Shelf

  • Purchasing Seedlings at the Local Nursery: We need 45 of the seedling for our garden this year.  Aside from the fact that no nursery in our area carries the varieties of heirloom tomatoes, peppers and luffa that we sprouted, the average cost of each seedling is around $2.50.  That makes for a total cost of $112.50. For our garden, buying the seedling would have been less expensive, certainly when you add in the cost of the seeds themselves.  Fortunately, this is the second year we are using our seed sprouting setup, so we are in to the profit phase of the adventure.  And thanks to the thrifty smart ways of the BonBonEater, we have enough seeds for next year already!

The Verdict:

Much like planting a blueberry bush, sprouting seeds indoors requires and initial investment of time and money.  Understand that with a year or so of care and patience you will reap delicious rewards as well as a net profit on your investment.  In the mean time, sprouting your own seeds will provide you and your family with daily adventure, a more intimate understanding of where our food comes from, and access to growing plants not available at your local nursery.

We love the excitement and eagerness in our children’s eyes as they watch the seedlings grow.  We love having healthy, interesting varieties of seedling to share with our friends and family.  We LOVE saving money.

Verdict: Awesome!

~The Suburban Hayseed.

Simple, Affordable and Attractive Raised Beds

A Truck as a Raised Bed!

Now that's a raised bed!

Building raised beds for your garden – whether for vegetables or flowers – can be as complicated or as simple as you like.  From rustic railroad ties to cinder blocks to decorative landscaping stones, whatever you feel fits into your landscaping theme can be used to hold in a few more inches of amended, delicious soil to cultivate your crop.

Our adventure into creating raised beds began in order to get our plants roots up out of the hard packed clay that is the norm in our region.  As we amended the garden beds with compost and peat moss to lighten and enrich the soil, we ended up with garden ‘mounds’ instead of garden ‘beds’.  These mounds were not particularly attractive and were irresistibly inviting to the nearby grasses and local invasive weeds.  We yearned for a cleaner, easier to maintain, attractive, durable, economical and space efficient solution.

Having drooled over many episodes of Jamie: At Home, Jamie Oliver’s beautiful brick raised beds at his home was what really inspired us to take action.  Unlike Jamie, we have a typical suburban back yard and limited funds with which to build raised beds, so we knew the beds would not be brick.  Sigh.

Considering the criteria for the raised beds I sited above and planning for a base raised bed size of 16 feet by 4 feet and ultimately 12 to 18 inches tall, here is what our research revealed:

  • Cinder Block: Cinder Blocks are readily available at just about any local home improvement store.  They are not particularly expensive and are certain to last a long time. For around $80 we could build a bed with a 16′ x 4′ internal dimension.  The rubs here are that we would need to provide a level base upon which to lay the blocks (lots of work in a sloping location) and we would be left with an unfinished top edge of block holes requiring another $70 or more to cap attractively.  Our final decision to look elsewhere for a solution was based on the fact that the external dimensions of the bed would be 17.5′ x 5.5′ due to the width of the blocks.  In our yard, the compounding width effect would diminish the number and spacing of beds we could create and still have enough yard for play.
  • Landscaping Blocks: Landscaping blocks come in a vast array of colors and sizes to choose from.  If your main concern is the appearance of your beds, these blocks would be good choices.  For our consideration, landscaping blocks have the same drawbacks as cinder blocks, and they cost 3 to 8 times as much.
  • Pressure Treated Lumber: Less expensive than blocks of any sort, pressure treated lumber is easy to build with and promised to last a good long while.  There are some scientific studies that have shown that the ‘leaching’ of the chemicals used in pressure treated lumber is very small, and little or no trace of it shows up in vegetables grown near it except in the case of root vegetables such as carrots are growing within inches.  I don’t really what to have to worry about where I grow my carrots, so no pressure treated lumber in my garden.
  • Builder Grade Lumber:  The inexpensive pine boards that are sold in every home improvement store were an attractive option.  For a total cost of $70 for lumber and stakes to build a 16′ x 4′ x 12″ raised bed that was less expensive than a cinder block bed and took up 1 1/2 feet less space!  The life span of the pine was questionable, though.  Would it last a year?  Two?  Five?  It would definitely rot rather quickly based on how long my tomato stakes lasted (two years).  Is there a better solution?
  • Engineered Lumber:  Sort of like ‘Engineered Hardwood Floors’, what I am talking about are decking products that are made out of plastics, resins and wood pulp.  These products will last indefinitely and have the same ‘low profile’ advantages as other lumber.  Sitting down to do the math, I found that our 16 foot raised bed would cost nearly $250 and would then only be 10 inches deep.

The answer came one day while our family was perusing one of our favorite stores:  Tractor Supply Company.   We were wandering around the outside portion of the store brainstorming creative uses for 1000 gallon galvanized water troughs (hot tub?), wire cattle fencing (Garden trellising?) and other such utilitarian treasures when we happened upon at huge stack of fencing boards.  Sixteen foot long, rough-hewn Oak boards.  Heavy, hard and beautiful, and at only $8.99 each!  I quickly calculated our raised bed cost to be $60 including the 2″ x 2″ x 18″ surveying stakes we would need to fix the beds in place.  The best deal yet!  The Oak will definitely outlast the pine lumber and is less expensive to boot.  We have a winner!

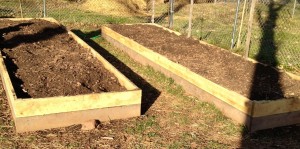
Two of our 16 x 4 foot raised beds constructed from rough-hewn oak fence boards.

Two of our 16 x 4 foot raised beds constructed from rough-hewn oak fence boards.

More details and pictures on how to assemble a raised bed from oak fence boards are on the way!

~The Suburban Hayseed.

The Joy of Backyard Chickens!

Lay or Bust - Backyard ChickensOne of the reasons The Suburban Hayseed got his name was because he’s got chickens living in a chicken tractor in the back yard.  Not everyone does (though many more should).

There are a lot of questions asked about the motivations leading to this adventure and the logistics concerning backyard chickens.  I’ll answer a few of them in a minute, but first, check out this video that will answer the biggest question: why? 

The pure joy and wonder on that little face and in that little voice makes it all worthwhile!  The eggs are delicious and fresh, the constant flow of organic fertilizer is nice, the chickens are amusing to watch and there hasn’t been a tick on any member of the household since the chickens arrived.  All great benefits, yes.  Yet the true and compelling reason to have those chickens are the experience, joy, wonder, friendship and education they bring to the children.

The Suburban Hayseed has a whole bunch of interesting and amusing chicken adventures.  Check back often to follow the story.  Better yet, check out the sidebar and Subscribe to The Suburban Hayseed and keep abreast of the adventures!

A sneak peak at some upcoming Backyard Chickens topics:
  • The Chicken Tractor: an adventure in re-purposed pallets.
  • Peppa, the Hurricane Chicken.
  • How much work do Chickens really require?
  • Do Chicken make good neighbors? A tutorial on clipping wings.

Cheers!

~The Suburban Hayseed.