What to do with Clay Soil

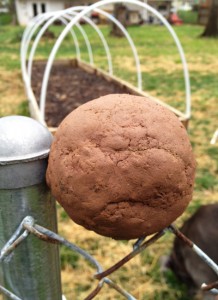
If you can make a ball out of your soil that stays, you've got Clay Soil!

A clay baseball made from the soil in our yard. This ball actually stayed together well enough to throw it and have the dog fetch it and bring it back with only teeth marks to show for the adventure!

Have you ever wondered if the soil in you area has a lot of clay?  I have read online about several tests you can perform to figure out what is in your soil.  Though I have tried them (my favorite involves a mason jar and a scoop of soil), I have settled on the simplest of all: moisten some of your soil well, or just wait until a day after it rains.  Dig up a scoop and try to make a ball out of it.  If you can make yours look like the one in the picture on the left, congratulations – you have some serious clay content in your soil!

So, you have clay soil.  What now?  Some of the problems with high clay content are that it is so dense and heavy that water, plant roots and even your shovel have a hard time getting through it.  Once water has managed to permeate the clay, it takes a long time to seep away.  As a result, plants grown in clay tend to suffer from drowning, suffocating and rot more often than in loamy soils.

There are some benefits to clay soils, though.  The nutrient levels in clay are quite high.  Depending on where you live and what kind of clay you have, you will find that the PH of the soil is naturally beneficial a certain segment of plants.  Here in the Washington D.C. region, our red clay is particularly acidic which is nice for plants such as hydrangea and blueberries.  That said, you will need to improve the drainage and friability of you clay.

Ways to Improve You Clay Soil:

  • Add Compost:  If you practice composting, this is an excellent addition to the soil.  Compost ‘lighten’ the clay, improving the drainage quality and availability organic matter and air for your plants.  I have found that all of the compost I could possibly produce would not be enough to help all of the soil we garden.  I have found a good source of vegetable compost (versus compost derived from sewage) and buy it by the cubic yard, which is a small pickup truck full.  It costs about $30 per yard at Virginia Ground Covers.  We have had good results in about a half and half mixture of compost to clay along with the other additions yet to be mentioned.
  • Add Peat Moss: Peat Moss improves both the clay’s water retention and drainage qualities as well as further ‘lightening’ the soil so that plant roots can successfully penetrate the soil in search of nutrients.  I mix in two 3-cubic-foot bales of peat into each cubic yard of compost in amending our clay.  Peat is running about $10 per bale at Home Improvement stores.
  • Add Coarse Builder’s Sand:  Coarse sand will further improve the drainage of clay soils.  We have only added sand to our blackberry and raspberry patches, finding that the volume of peat and compost is enough to work well in our other gardens.  Coarse builder’s sand is readily available and inexpensive at your local Home Improvement store. 
  • Add Gypsum:  Gypsum is sold by many different brand names for the purpose of ‘breaking’ your hardened clay soils, creating an environment more suitable for roots to grow and spread.  The results of adding gypsum are due to a chemical reaction with the clay and are temporary.  We have found it useful to add gypsum to new garden beds when we fist mix in our other amendments.  The ‘breaking’ effects help to crumble the clay into smaller bits and integrate more thoroughly.
  • Adjust your PH:  You will need to test your soil in order to adjust your PH properly.  I recommend having your local Extension Office complete the test versus buying a test kit at the store.  The Extension Office performs a much more controlled test and achieves very accurate results.  You will also need to know what types of plants you will be growing in order to adjust your PH to the correct level.  I grew up cleaning out the fireplace ashes and tossing them around the Lilac bushes to ‘sweeten’ the soil, as my father calls it.

With the need for so many additions to our soil, we build raised beds for our gardening.  With some guides to gardening, it is suggested that in raising the beds you might as well simply fill them with good garden soil and leave the existing clay alone.  I am very careful to turn up the clay and mix it in to the amendments.  Why?  My wife asked me the same thing.  There are several reasons:

Our native clay have mineral resources and nutrients that I would otherwise have to add, creating more effort and expenditure.  Clay itself is has excellent water retention properties which are a welcome addition to any garden, in moderation.  Working the amendments into the clay results in raised beds that are cultivated 6 to 8 inches below ground level, so our 12 inch tall raised beds are actually 18 to 20 inches deep in terms of perfect plant growing soil.  Lastly, our clay represents here.  Were I to grow my vegetables in the same purchased soil mixture as someone a thousand miles away, I might as well have grown them anywhere.  I am attached to tasting a sense of Terroir in our food.  There is more to Local Food than where it is produced.  A producer of hydroponic lettuces just down the street is definitely local in that the produce has not been trucked a thousand miles (which I am thankful for), yet that same lettuce has no sense of place in the respect that it could have been grow anywhere.  I’ll still buy the locally produced hydroponic lettuce over the heads grown half way around the world, and I’ll feel good about it!  And I will still expend the extra effort required to churn our clay up into the compost of our raised beds.

Please share your adventures in working with clay soil.  We’ve all taken different approaches and have differing results in trying to grow a successful garden in the hard-packed clay.  Feel free to ask for some help, too!  I’m sure that if I cannot help, there are many readers who have struggled with similar issues and would love to help.

Cheers!

~The Suburban Hayseed.


Sprouting Seeds!

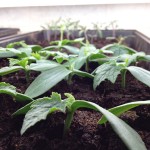
Healthy Luffa and cheery tomato sprouts in an economical speed sprouting shelf.Sprouting seeds indoors at home is both interesting and economical.  Our family has found it fascinating to prepare the soil blocks, organize the seeds, water them daily and watch them emerge and develop into the plants that will be our garden. Thanks to my lovely and thrifty wife, the BonBonEater, our entire seed spending this year totaled $6.74 including shipping.  Check out her blog soon for how she accomplished this feat!  Now that’s a serious savings compared to the $2.47 we would have paid at a local nursery for each tomato seedling!

In addition to the savings on the seeds, sprouting seeds indoors allows you to get a jump on the growing season, thereby giving your plants the head start to develop a strong and thriving energy factory with which to produce a bumper crop of fruit$ and vegetable$.  With a bit of prior planning, you can have healthier seedlings to plant than you could buy.  An added bonus is that you will know exactly how they were grown – organic or otherwise.

Indoor seed sprouting can be as simple or complicated as you wish.  I am going to share how we do it, which is more involved than sticking seeds in a pot in the window, but less complicated than a full-blown nursery setup.

The following is a list of the key components we use in sprouting seeds.

I am including ‘why’ we use each, and approximately how much they cost as well as their expected lifespan so that you will be able to calculate the per-year cost and make the decision to invest or not.

Soil Blocker:

The BonBonEater really had to convince me to try this contraption out.  I was satisfied using compressed peat pellets which are inexpensive and easy.  She pointed out that we have to buy the pellets every year, and in spite of their claim that the netting around the pellet biodegrades, we dug them up every spring as we turned the soil.  The Soil Blocker  uses wet seed starting mix and creates freestanding ‘blocks’ of soil in which to place your seeds.  Some advantages are that you can use your own formulation of seed starting mix, choose your own trays on which to sprout your seeds, and the soil blocks provide the correct environment to ‘air-prune’ the seedling’s roots.  Apparently the soil blocks nearly eliminate transplant shock as well.  A 2-inch soil blocker like we use costs around $30 and will last a lifetime. Excellent instructional videos and soil blockers for sale can be found at PottingBlocks.com.

Seedling Heat Mat:

Seedling heating mats are a real bonus for sprouting seeds indoors.  They gently warm the soil in your seed trays 10 to 20 degrees above the ambient temperature in the room.  In the event that you are going to use and unheated portion of your home for your seed sprouting such as a garage or utility room like we do, the warming mats are a must in order to get a good jump on the season.  It is darn cold outside in February, so getting the best germination and growth out of our seeds requires a mat.  They only draw a few watts of power, so seedling heating mats add nearly nothing to your overhead except for the price of the original purchase.  You can find seedling heating mats at many local home improvement stores and nurseries as well as online.  They cost between $15 and $30 depending on their size and where you buy them.  FarmFeliz.com has an amazing array of heating mats and germination kits at very reasonable prices.  They carry a cool windowsill heat mat that would be perfect for you if you keep your house cool in the winter and want to give a boost to your seed sprouts!

Lights:

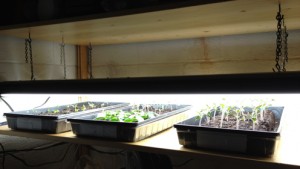
Once your seedling have developed their first set of real leaves (not the first two little round ones that emerge) they will need a good, strong source of light to begin their photosynthesizing life.  A sunny windowsill will be a good start, but the short days and week winter sun will need some help in order to provide your seedlings with enough energy to grow dense and stocky like you want.  There are many types of lights on the market for such purposes, but we chose to go a very economical yet effective route: florescent lights.  I bought 4 foot shop light fixtures at Lowes for $13 each.  Our 4 foot by 2 foot shelf dedicated to sprouting seeds is completely covered by 3 of the fixtures.  Bulbs cost about $5 for a set of 2.  I bought some warm (3500k) and some cool (6500K) bulbs and put one of each type in the fixtures, which hold 2 bulbs each.  This gives your plants a good, balanced diet of light and saves a lot of money versus buying the ‘grow light’ designated bulbs. Total cost for our lighting was $54.  The bulbs will need to be replaced every 2 to 3 years for $15, and the fixtures should last many more than that.

A Timer:

Every lighting set-up for sprouting seeds needs to have a timer.  You can spend oodles of money on timers if you would like.  Fortunately, florescent shop lights have only 2 pronged plugs and use relatively little energy.  This allows us to use a $4 timer purchased at Ikea.  It’s mechanism is simple and mechanical which makes it inexpensive, reliable and easy to use.

Is Sprouting Seeds Cost Effective?

Seeds, lights, heating mats, timers, soil blocker – these all require an investment in time and money.  Is it really worth it when compared to buying seedlings at your local nursery? The answer depends on how many plants you want to grow.  If you only need 2 tomato plants, you will find this investment to be steep when compared to bought seedlings. If you need 300 tomato plants, you will need additional equipment.  I will share what our seed sprouting setup will accommodate.  You can do your own math from there.

the number$ for our family this year.

  • Seed Sprouting Setup Cost: All equipment and soil required to create and maintain a 2 foot by 4 foot seed sprouting shelf on which we sprouted 96 seeds: $145. We only need 45 of the seedling ourselves, so we will have plenty to give away.  For the additional cost of another seedling heat mat, a bit more soil and a tray ($20), and by tightening up the spacing of the soil blocks, we could sprout as many as 160 seeds!

    Photo of our Seed Sprouting Shelf.

    Our $145 Seed Sprouting Shelf

  • Purchasing Seedlings at the Local Nursery: We need 45 of the seedling for our garden this year.  Aside from the fact that no nursery in our area carries the varieties of heirloom tomatoes, peppers and luffa that we sprouted, the average cost of each seedling is around $2.50.  That makes for a total cost of $112.50. For our garden, buying the seedling would have been less expensive, certainly when you add in the cost of the seeds themselves.  Fortunately, this is the second year we are using our seed sprouting setup, so we are in to the profit phase of the adventure.  And thanks to the thrifty smart ways of the BonBonEater, we have enough seeds for next year already!

The Verdict:

Much like planting a blueberry bush, sprouting seeds indoors requires and initial investment of time and money.  Understand that with a year or so of care and patience you will reap delicious rewards as well as a net profit on your investment.  In the mean time, sprouting your own seeds will provide you and your family with daily adventure, a more intimate understanding of where our food comes from, and access to growing plants not available at your local nursery.

We love the excitement and eagerness in our children’s eyes as they watch the seedlings grow.  We love having healthy, interesting varieties of seedling to share with our friends and family.  We LOVE saving money.

Verdict: Awesome!

~The Suburban Hayseed.